Changing the Main Grid
Any screen can be customized. If you think you will want to save your changes, you should first create a new screen.
Open the Options Tab
To add different statistics or change how the main grid is grouped, start by opening the “Options” tab near the top-right corner of the application.
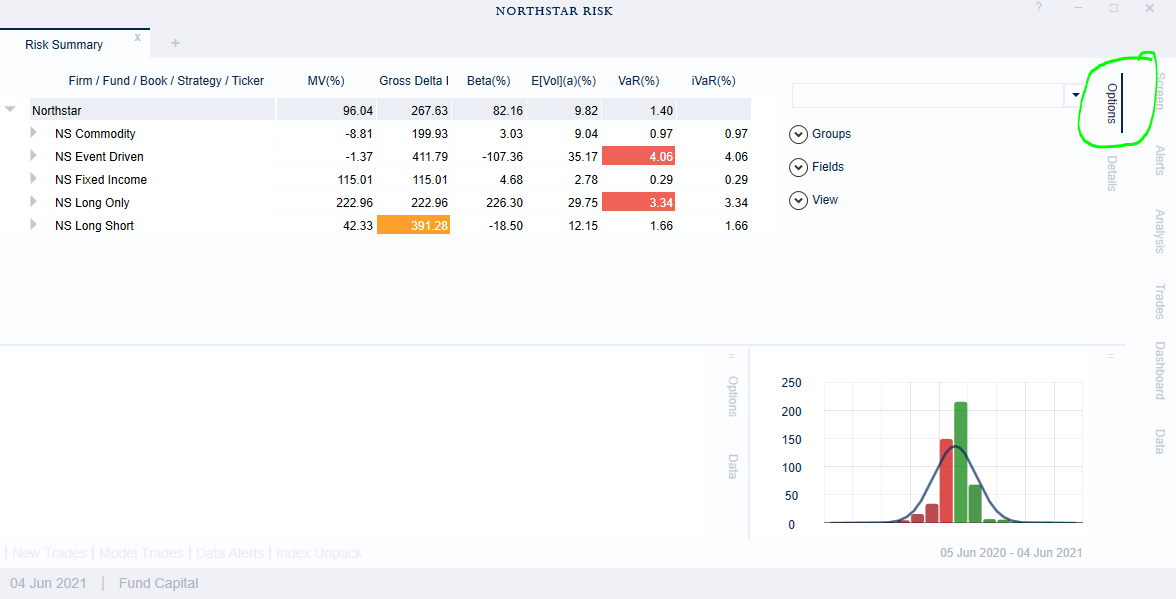
Change the Grouping
There are two ways that you can change the grouping,
Use the drop-down menu at the top of the options tab to select from common groupings;
Click the down caret next to “Groups”. You will see the current fields used for grouping. To remove a field, right-click and select “Remove”. To add a new grouping field, use the drop-down menu just below the box containing the already selected fields. Once selected, you can drag fields up and down to change the grouping order. Once you have all the fields you want in place, click “Run”.
Change the Columns
To change the fields shown in the columns, with the Options tab still opened, click the down caret next to “Fields”. Just as with grouping fields, you can right-click to delete columns, drag fields up and down to change their order, and select new fields from the drop-down menu.
When using the drop down menu, you can simply scroll from top to bottom, but there are a lot of fields to choose from. You may find it easier to just type what you are looking for. You can either type the name of the field (e.g. VaR) or a key word or category (e.g. “stress tests”).
Most risk statistics have both a percent and dollar version (,or GBP, or Euro, or …). For example “VaR” is value at risk in dollars and “VaR(%)” is value at risk as a percentage of AUM.
View
The View sub-menu contains some less frequently used options:
New Trades: Highlights portfolio or positions that contain new trades.
Portfolio Alerts: You can set alerts for any risk or performance statistics. You can see all of the statistics currently being monitored by opening the Alerts tab (right side, near the top). These alerts can be viewed in reports or emails. If you check this box you can also see the alerts in the main grid.
Data Alerts: Data alerts highlight any unusual aspects of the underlying market data or portfolio data. For example, if there was a large number of trades that would be highlighted.
Closed Positions: In most cases, you want to include closed positions when you are looking at P&L or performance statistics, but when you are looking at risk you only want to see open positions (the risk of closed positions is, by definition zero). For this reason, by default, this check box will automatically be checked if the main grid has contains any performance data, and it will automatically be unchecked if you only have risk statistics. If you would like to include closed positions, even when you do not have performance data, you can manually check this box.
Compare to: If you’d like to see how the portfolio has changed over time, you can use this feature to compare your portfolio on two different dates. The portfolio will display the two portfolios side-by-side.
Portfolio Filter: If you have multiple funds, but only want to see one, you can select the fund that you’d like to see from the drop-down menu.
Security Search: You can search for individual securities using the search box. Depending on how the portfolio is grouped, just type the ticker or name that you are looking for.
Changing the Date Range
The end date for all screens is the same. You can see the current end date in the bottom-left corner of the application. To change the end date, click on this date, select a new date, and click load.
For screens with performance data, the date range is indicated at the bottom-right of the application. You can click on this to change the date range. You can select commonly used ranges (MTD, QTD, YTD, ITD) or create a custom range using the calendar date selector.
Changing Capital
Some firms have multiple capital levels. For example, if you allocate risk capital to portfolio managers, you might want to switch back and forth between fund capital and risk capital. You can do this using the capital level selector at the bottom-left of the application.
Saving Your Changes
If you created a new screen and you want to save your changes, open the “Screen” tab at the top-right and click Save.